Hiking to Kjeragbolten was one of the absolute highlights of our Norway trip. In fact, it was a photo of a daredevil hiker standing on the boulder that sealed the deal on our decision to do a road trip through the country!
Kjerag is a challenging climb and we had lots of questions around the practicalities of the hike and what it was like to stand on the infamous Kjeragbolten boulder. Now that we’ve done it, we wanted to share the benefits of our experience with you. Here’s our ultimate guide with everything you need to know about climbing Kjerag and standing on Kjeragbolten!
Click here to read about our Kjerag adventures!
1 | How difficult is the Kjerag hike?
Let’s get this straight: climbing Kjerag is difficult! It’s a 9km route with 3 steep ascents all mixed in with lots of climbing on rocks which can be really slippery if it rains. In total, there are around 600 metres of uphill hiking and, at times, it’s steep enough to need to use the guide chains which line the most challenging parts of the route.
Fitness:
I found the third and final climb a bit of a struggle as it seemed to keep giving and giving but overall the hike always felt manageable and I would consider myself to be of average fitness. My marathon running, fitness loving husband found the whole day a breeze!
The steepest parts of the climb are lined with guide chains:
 Check out our stats from the day for more detailed information on the hike, timings and elevation:
2 | How do I find my way to Kjeragbolten?
Most of the route is clearly marked with stone piles which have prominent red T’s painted onto them. The markings are positioned closely enough so that the next marking is visible making it easy enough to find the way. There are also some very pretty signposts that provide reassurance of being on the right path!
 Which way? This way!

3 | Where we stayed before hiking Kjerag
We arrived in Oslo the morning before our Kjerag climb and made the 7 hour drive to Lysebotn on the same day. Our aim was to stay as close as possible to Kjerag as we wanted to start the hike bright and early the next morning. We opted to pitch our tent at Lysebotn Camping which is a 5 minute drive to the Kjerag car park. It was a little more expensive than other campsites we stayed at during our Norway road trip but the location was perfect and the views of Lysefjord were breathtaking.

We had planned to stay in Flørli 4444 Hostel, a beautiful hostel located right on the shores of Lysefjord with incredible views across the one of Norways most beautiful fjords. The hostel is only accessible by ferry and unfortunately the ferry had not started for the season when we visited so we never made it. This stunning hostel comes highly recommended and is not to be missed on a trip to Lysefjord – Check prices now!
Click here for the best places to stay at Kjerag
4 | Kjerag and Pulpit Rock (Preikestolen)
After we finished our Kjerag hike we drove to Stavanger and took the ferry to Tau* where we spent the night in Wathne Campsite. Tired, frozen and wet, we treated ourselves to a cabin to thaw out and dry off! The next morning it was a 30 minute drive to Preikestolen where we took on the stunning Pulpit Rock!
*1 day later and the Lysebotn to Songesand ferry was in operation. It runs during the peak tourist season and saves some driving.
A well deserved cabin after Kjerag!

Where to Stay When Visiting Pulpit Rock
Hiking Pulpit Rock is one of the must do Norway experiences, however the hike is very popular and can get very busy during peak periods. We recommend booking your accommodation well in advance and staying as close to the hike as possible to allow for an early morning or late evening hike to the summit.
- Wathne Camping: We stayed here in a cosy cabin in Lysefjord between our hikes of Kjerag and Pulpit Rock. The cabins are spacious and very comfortable with everything you’ll need to relax and unwind after hiking. This was one of our favourite cabins in Norway. It’s a 30 minute drive to the Pulpit Rock car park from the site – Click here for best prices!
- Hostel Ryfylke Vandrerhjem Vaulali: A good budget option if you’re looking for something basic to get some rest on your in between hikes check out this cosy hostel – Click here for best prices!
- Lilland Hotell Apartments: A modern apartment option located in Tau close to the ferry from Stavanger with free parking. Perfect for a short stay while visiting Pulpit Rock – Click here for best prices!
- Haabakk on Sea: Another perfet apartment option located just outside Tau and less than 20 minute drive to the Pulpit Rock car park. close to the ferry from Stavanger – Click here for best prices!
Click here for the best places to stay at Pulpit Rock

5 | Can I hike Kjerag if I’m scared of heights?
I’m not the biggest fan of heights and I found Kjerag manageable. The return journey is more difficult as there are lots of steep downhill sections and I was glad to have my awesome hiking buddy to help me along. As soon as I saw the Kjeragbolten boulder I knew stepping out onto it wasn’t an option as I’d potentially get dizzy and take a tumble. Not recommended when 1,000 metre drops are involved!
Downhill views:
The inclines are intense!

What goes up must come down! The steepest climbs:
6 | What’s it like to climb onto the Kjeragbolten boulder?
DON’T LOOK DOWN are probably the best words of advice we can offer! The boulder is accessed by edging around a small ledge and stepping out onto the rock. The step out onto the boulder does involve a small leap of faith but, if it wasn’t for the 1000 metre drop on one side, there would be plenty of room to maneuver!
7 | Is it safe to climb onto the Kjeragbolten rock?
The most difficult part of Kjeragbolten is stepping around the ledge onto the boulder. The rock itself is quite large and flat so there is a little wiggle room. We’ve googled this and apparently there have been no falls from the boulder which added to our peace of mind.
Front view of the boulder:

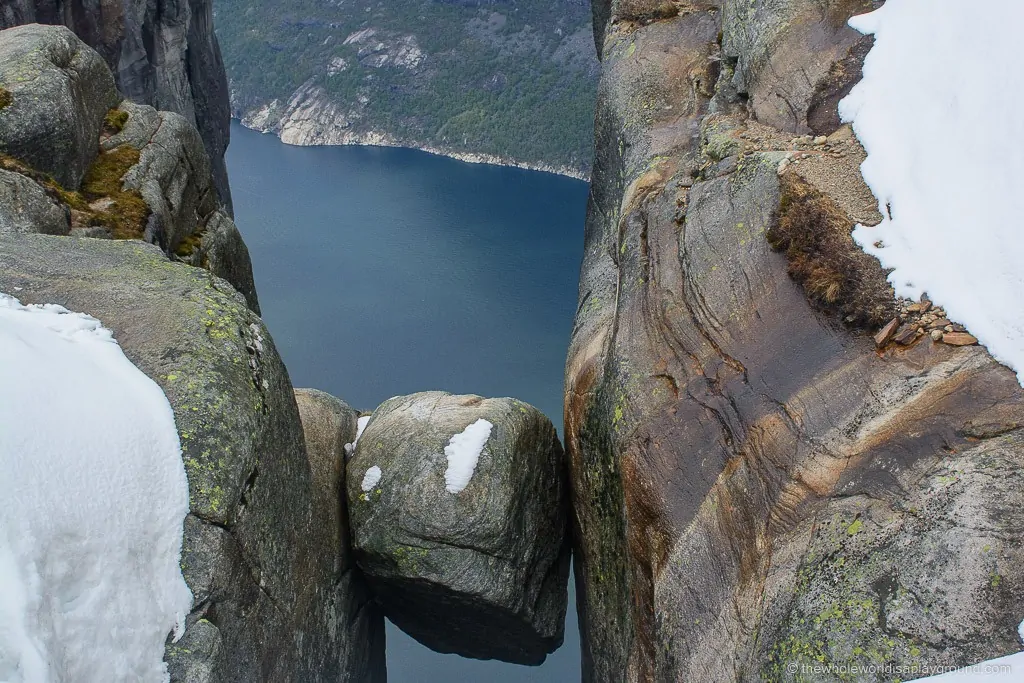
The boulder from above:
 Standing on the boulder:

8 | What to wear to hike Kjerag
Layers! The altitude makes for very changeable weather and temperatures and we experienced rain, snow, wind and blistering sunshine during our hike! Our gear included:
- Hiking boots (we recommend boots rather than runners for the challenging terrain)
- Leggings
- Waterproof pants
- Long sleeve cold weather top
- T-shirt
- Lined waterproof jacket
- Hat
- Sunglasses
- Waterproof dry bags for our camera equipment. These are extremely useful for protecting your electronics in wet environments
When it rains, it pours! All wrapped up:

Loving my pink layers!

9 | Food and Drinks for Kjerag
There are no shops on the climb so bring enough food and drink supplies for the hike! We brought 1.5 litres of water and some sandwiches, crisps and energy bars. For hikes, I am the designated water carrier while Dave takes care of the camera equipment. I used a Camelbak rucksack which holds 1.5 litres of water and has a bite valve at the front to make for easy sharing between the two of us. I don’t even notice I’m carrying it most of the time which can only be a good thing!

10 | What else to bring?
We also brought our cameras and a GoPro to record the action – not forgetting lots of spare batteries and an extra memory card! We didn’t see very many hiking poles on the day we climbed but it did seem like they would be difficult to handle on the steepest parts of the route.
Check out the camera gear we use here

11 | Base Camp! Kjerag Information Centre
The hike starts from Øygardstøl which is a few minutes drive above Lysebotn. There’s ample parking, a hiking map, toilets, a small information centre and a cafe. We popped into the information centre to check on the hiking conditions and pay for our parking for the day (100 NOK). At the end of the hike we rewarded ourselves with an expensive diet coke in the cafe and soaked in the incredible views of Lysebotn.
Kjerag parking:

The Information Centre:
 Route maps:

Check out the views from the cafe:

So there you have it, all our best tips on hiking Kjerag! Most of all have fun and enjoy the incredible scenery along the way!
Amazing adventure
Very inspiring – thank you!
This is incredibly helpful! Thank you so much for sharing!
Thanks DK, glad it was useful! Hope you enjoy the hike!
Hello Elaine 🙂
We would love to do Kjerag and Preikestolen on the beginning of may. Is it possible?
Thank You 😀
Hi Tom, we hiked Kjerag and Preikestolen at the very end of May. A few things to note – the car ferry does not operate from Stavanger until June so you have to travel by road and the road opening is weather dependent so be sure to check the latest update. We were told that a guide was recommended for Kjerag until a few days before we hiked as the trail wasn’t clear through the snow but we were able to follow other hikers paths the day we hiked. I guess it’s totally dependent on the Norway weather as to how to early in the season things happen though!
Hope that helps!
Thank you for all information ! Very useful 🙂 We are planning to hike at the end of May, hope there won’t be a lot of snow !
All the best and happy travel !
Kate
Hope you have an amazing trip Kate!
Hey Elaine, that’s a real informative post. We will go on September 1st. Is is possible to camp outside of camping site by ourselves or anywhere on the trail without paying?
Thanks is advance
Hi Piash! We saw tents on both the Kjerag and Pulpit Rock trails so it seems like it might be ok to camp there. As far as I know Norway allows wild camping as long as you follow rules regarding using only appropriate spots and being a certain distance from houses.
I’m in Wathne camping after hiking Priekestolen reading your article. Then noticed the picture of your cabin you stayed in. The exact cabin I am sitting on the porch reading your article. Crazy!
Adam that’s brilliant, definitely one of my fave comments to read! How was the hike? Hope you got great views! Are you planning any more hikes? We did Kjerag as well!
Elaine
Looks awesome! Just to clarify, is it a 6 hour hike return? Or 6 hours for just the single way up to the boulder? Thanks
Hi Angelica, glad you liked it. It’s a 6 hour return hike, however this doesn’t allow for stops or time at the actual Kjerag boulder. Depending on the weather / fitness you can maybe do it quicker but 6 hours is a standard trip.
Hi! Thanks for the lovely post! I’m planning to do the hike myself soon too. May I ask when/ which month did you do your Kjerag hike in? There seems to be a lot of snow in your pictures, is that normal for the hike and would it make the paths slippery/ dangerous?
Hi Vanessa! We did the hike in the last few days of May. I think it is quite normal to still have some snow at the beginning of the season – the week before we arrived it was recommended to only climb Kjerag with a guide. The snow made it more difficult in some respects but coming down was a lot of fun and very fast! Let us know how your hike goes!
Elaine
I would like to do Pulpit Rock one day then Kjeragbolten the next. Advice on the best way to get between the two? I will have a car.
Hi Chris
We did them on two consecutive days. We hiked Kjerag first and then drove to a campsite near Pulpit Rock and hiked it the next morning. Pulpit is a relatively easy hike in comparison to Kjerag.
Hope that helps, have a good trip!
Elaine
Hello, we are going at the end of March, is it impossible to climb the kjerag and pulpit?
Thank you!
Thanks for sharing your adventure. Very informative and inspiring. The question I have is climbing the boulder. Does one need to jump to it? Is there much distance from the edge to the boulder and how do you climb back?
Appreciate your time
Hi Habib, good question! Actually standing on the rock isn’t really a problem, but to get on it there is a narrow ledge to one side that give you access to the Kjerag Rock. This bit is a little scary as you see the entire drop below but it is safe. So you don’t need to jump. Just take your time and it’s fine. Standing on Kjerag was one of the most fun things we’ve ever done!
Hey,
I was wondering to hike Kjerag this January 2017. would you reckon i do so? or would i be dangerous since it is still winter? this would be my first time
Hi Mimi
No I don’t think it’s possible and, if it was, it would be very dangerous in case of snow storms etc. When we went in June it was the first week of the season that it was ok to hike without a guide and it was still snow covered.
Hope that helps, enjoy Norway 🙂
Elaine
A massive trek to get somewhere remote for the perfect photo is not unheard of for me! Last year, in January I travelled to Prague for a few days, then took a couple of trains 4.5 hours from the hotel in Prague to a remote village called Dolni Morava, where I missioned up a cliff to the Skywalk. It was breathtaking, and such an experience, I would definitely recommend it, as it sounds like the sort of adventure you would love. In the meantime, I’m bookmarking your post and adding Kjeragbolten to my bucket list! Maybe next year ? which is the closest airport to it? As it’s Black Friday flights to Norway are super cheap with Norwegian Air today, hence all my googling! x
Hi, is it possible to trek Kjerag in end October?
Hi Supranee
Depending on the weather, October is possible. Bring lots of layers and warm clothes – it’s about 10 degrees cooler at the top and the weather can change quickly.
Elaine